Probe Basic APT Stable Install
Warning
Seeing a “Missing key” warning or error when you update? Start here.
Older versions of these instructions installed the wrong signing key.
If sudo apt update shows a line like this:
Missing key 50F874571F20C5B0BA225E2F0CDFCCE0388CFA48, which is needed to verify signature.
If you are trying to update and are seeing this warning/error message, the following line will correct the situation by completely removing and reinstalling Probe Basic and its required keyrings cleanly, to resolve the issue going forward.
Please be sure any of your configuration files are backed up
before running it – installing rewrites the configs shipped with
Probe Basic in ~/linuxcnc/configs/, so any edits you have made to the
core Probe Basic shipped configs will be overwritten.
Copy this, paste it into a terminal, and press Enter:
curl -fsSL https://repository.qtpyvcp.com/uninstall.sh | sudo sh && curl -fsSL https://repository.qtpyvcp.com/install.sh | sudo sh && sudo apt install -y python3-probe-basic
Only Probe Basic, QtPyVCP and the packages installed alongside them are
affected. When it finishes, sudo apt update will no longer show the
“Missing key” message, Probe Basic is installed and up to date – you do
not need to follow the steps below – and it will update with new
releases cleanly going forward.
Probe Basic APT Installation Guide for use with Debian 12 Bookworm and LinuxCNC version 2.9 or Later
Important Requirements
Probe Basic is currently designed for 1920x1080 screen sizes only!
Probe Basic requires graphics hardware that supports OpenGL 3.2 and OpenGL Shading Language (GLSL) 1.50 or later
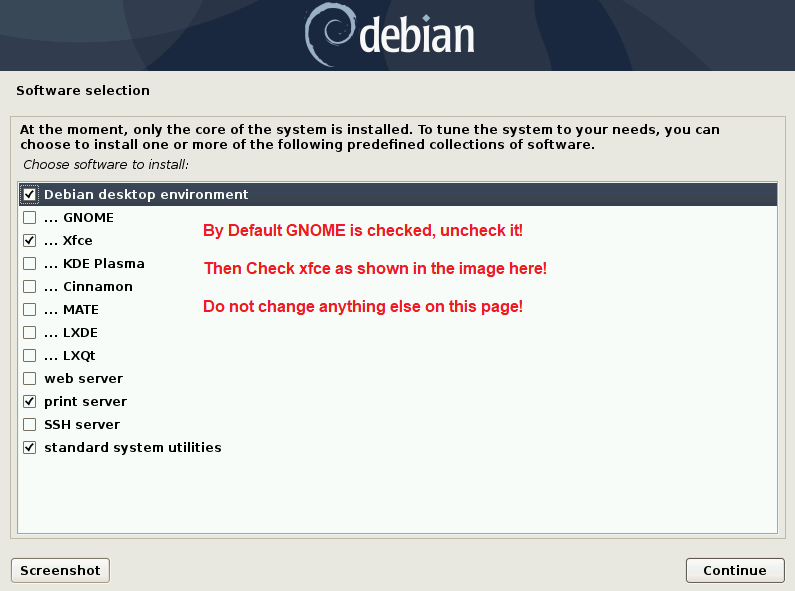
Probe Basic is tested on xfce4, during install of Debian 12 ISO:
DO NOT enter a Root password during installation, leave blank and skip this page.
During installation, this screen below will appear, be sure to uncheck gnome and check xfce as pictured below. No other changes on this page are needed.
Installation Steps
1. Download the Linux Debian 12 Bookworm ISO Image File
Download from: https://www.debian.org/releases/bookworm/debian-installer/
Select the Linux Debian 12 Bookworm Netinst CD ISO from the above link. You will need to make a bootable DVD or USB thumb drive depending on how you plan to install. The below software is extremely easy and works flawlessly with Linux Debian OS images:
https://www.balena.io/etcher/?ref=etcher_update
Once you have created your flash stick for LinuxCNC, proceed to install and boot the system. (Note: It is advised to have an ethernet cable internet connection during install). Select the graphical installation option. Follow the steps on screen to complete installation. When you are greeted by the Linux Desktop Selection Page, uncheck the GNOME option and check the XFCE4 option.
2. Update the System
After installation, run the following commands in the main terminal:
sudo apt update


sudo apt upgrade
3. Install LinuxCNC (if not already installed)
Amd64 Deb (for PC’s):
Arm64 Deb (for Pi 4/5)
In a terminal, enter the following lines one at a time and press enter after each:
cd ~

cd Downloads

sudo dpkg -i linuxcnc-uspace_2.9.8_amd64.deb
Once you have installed LinuxCNC, open it and start the axis sim briefly and then shut it down to ensure the installation was successful.
4. Add the APT Repository for the Installation type
AMD64 for PC Installation Repository:
Run the following commands in the main terminal one at a time:
sudo apt install curl


echo 'deb [arch=amd64] https://repository.qtpyvcp.com/apt bookworm main' | sudo tee /etc/apt/sources.list.d/kcjengr.list


curl -sS https://repository.qtpyvcp.com/repo/kcjengr.key | gpg --dearmor | sudo tee /etc/apt/trusted.gpg.d/kcjengr.gpg
ARM64 Raspberry Pi 4 and 5 Installation Repository:
Run the following commands in the main terminal one at a time:
sudo apt install curl


echo 'deb [arch=arm64] https://repository.qtpyvcp.com/apt bookworm main' | sudo tee /etc/apt/sources.list.d/kcjengr.list


curl -sS https://repository.qtpyvcp.com/repo/kcjengr.key | gpg --dearmor | sudo tee /etc/apt/trusted.gpg.d/kcjengr.gpg
5. Update the Repositories
sudo apt update
6. Install QtPyVCP and Probe Basic
sudo apt install python3-qtpyvcp


sudo apt install python3-probe-basic
Congratulations! You have now installed Probe Basic. You should be able to launch the Probe Basic sim from within the LinuxCNC applications dropdown menu.
Updating and Configuration
Updating of Probe Basic and QtPyVCP will occur when you run the normal “sudo apt update” and “sudo apt upgrade” commands. During updating, the Probe Basic sim configuration files will be overwritten. It is strongly recommended to create your machine configuration files with unique names to avoid having them overwritten during updates.
Uninstallation
To completely remove QtPyVCP and all VCPs (Probe Basic, TurboNC, MonoKrom), along with the APT repository and its signing key, run:
curl -fsSL https://repository.qtpyvcp.com/uninstall.sh | sudo shThis works even if
apt updateis currently failing. It removes only this repository’s packages, sources and keys – other repositories on your machine, and your LinuxCNC configs in~/linuxcnc/configs/, are left untouched.To reinstall afterwards:
curl -fsSL https://repository.qtpyvcp.com/install.sh | sudo sh
sudo apt install python3-probe-basic
Probe Basic and QtPyVCP are now fully removed. Your LinuxCNC installation is unaffected.